How do we create monsters on the Gold Project (with a preview of the biome 1 !)
Good news fella ! Today we are showing you some images 👀
Of course, everything is not final and can change over the coming months.
We thought it would be cool to explain the process of creating monsters in the game.
What is the beginning ?
It’s a famous question players ask us many times “how do you start the work ?”. And the answer can sound frustrating as there is not one answer.
Sometimes the process will start with a quick drawing giving us ideas, it can also be based on a joke while chatting with the team. Or it can be when we try things in the code and something not planned happens (here comes the famous “it’s not a bug, it’s a feature”).
As there is no specific order or rules, we will try to explain those different steps.
Remember we do not use all of those steps in an exclusive way.
Before digging in, we must know what we need to make a monster.
How to make monsters by filling the game’s needs
A bit of Game Design is required. When talking about “needs of the game” it will be: We need a monster who can…
- fly
- have ranged attack
- walk on the ceiling
- blind the player
- jump in a specific way
- etc…
So we identify what we already have and what we haven’t. Then we try to estimate the difficulty of what we have today to create a scaled system.
To make Gold, we created the following legend. It lets us adjust each monster and try to get a graduating balance and difficulty over the play time.

Other types of needs we are looking for could be described as follows: How to make a monster that…
- do not let the player jump over it
- force the player to do a specific action
- induce the player to go to a specific place
In summary, Gold Project’s design is a mix of “ideas/concepts art/code/needs” which will define the monster.
Today, we have 19 Monsters planned for the game. Sometimes, during conversations, we have new ideas we love so much that we decide to add a new monster.
Sometimes it is because of an “accident” (we tried a few prototypes, and some concepts are really cool).
But we first try to make this fit the calendar.
Of course, “our way to do” is probably close to other teams.
There are dozens of ways to design a game but the components required to make a game are the same.
It’s normal to have similarities and maybe our explanations along this article sounds familiar to you.
Method 1: start by the Character-Design
It is one of the easiest methods to explain as it is visual. An artist makes some quick sketches we call concepts, then we talk about it.
While looking at this concept we may think “This one is great and gives me ideas”. It can also be right from the conception point that the artist got early ideas in mind.
What is the process of this method ?
The art team working on monsters will make concepts and then show off their work to the rest of the team. It can be very specific ideas like “this is an assassin”. Or it can be pretty vague and we start brainstorming about it.
Of course we will focus on the objectives coming from the Game & Level Design to get very different behaviors and monsters. From easy to very hard, with bosses etc…
Once the selection is done, the iterative process starts.
We take one monster, create a monster specs sheet (see method 2), then prototype it (see method 3). And finally validate it (see Iterations).
Some people would prefer to imagine every aspect of the monster before even making a prototype and testing it. We completely avoid this approach as it is very risky to spend a lot of time making animations, without guarantees of the monsters being cool in the end.
If we do so, we should tweak the monsters depending on the animation and not the opposite, the “gamefeel” would be locked.

Method 2: start by the Game Design
Starting by the Game Design is radically different.
This principle is to first think about different levels of monsters and the functions expected from each of them.
Then we create a monster sheet specs, containing the intention of the Game Designer and what we try to achieve with this monster. Potentially with an idea of what it could look like.
Here is what a monster sheet specs contain:

To make it simple, this general process can be shortened as follows: “we first write ideas that we test in our mind and then make a prototype of it”.
Once the writing is done, some people will consider their design job to be done and move on.
But we prefer to start prototyping with the help of the document, and give the freedom of creativity to the programmer in charge of this monster.
Then we have to tweak the monster and change it until it meets our expectations.
This cycle is completed by the art design, which means visuals and animations based on the prototype. We already know all the timings and all the attacks.
Sometimes the concept art of the monster is done before the code which helps us imagine what it is and what kind of behaviors and moves it should use.
Method 3: start by the Prototype
This method is probably the most popular across the game developers as it does not require any kind of work before “doing it”, like writing or drawing.
The principle of the approach is to code freely and widely anything that inspires us. Each programmer will have a different way to make this happen, depending on the skill and the will.
Side note, the more we do monsters in the game and the more we can start from/get inspired from/compose with an existing one. And this allows us to go faster and faster along the developpement.
Specifically in the Gold Project, we created a component system very helpful for the AIs. We can pick any component that already exists if it is close to what we want to achieve.
For example, we have some monsters capable of walking on walls or ceils and they use the “WallWalker” component. Any new monster needing that feature will just have to use the same component.
The big advantage of this method is that we can directly test out the monster along its making.
When it is validated, then the art team can work on visual and animations as they can experience it and play its final behavior, with timings and everything.
This avoids surprises and useless work for the art team.

The big downside of this technique is that we have to work with placeholders. It can be squares of colors or another monster that already exists even if it is not the same size or behavior (just to use something better than a square).
In our case we often use the basic Zombie as a placeholder but not only.
We can also use a concept-art image “static” (with no animations).
It is really hard to imagine the final monster when we are working with placeholders.
Sometimes we can think our work is not that good just because it’s visually empty. A very small visual fx can change all of it.
Also when playtesting it is hard to make a difference between monsters if they all look the same.
We must be able to identify the “fun of that monster” with a very simple placeholder, and then trust the art team to make it visually astounding.
Method 4: start with a Joke
This method is not a game changer compared to the others but it is real!
Sometimes while talking and drawing, or making prototypes, we can have what we call “stupid ideas” or “funny ideas”. It can be a way to exploit a bug to create a monster, or just a joke that sounds fun to do.
It’s hard to give you a visual explanation of it, but at least you know this exists! Will you be able to guess which monsters have been created, based on a joke or a bug ? 🤓
Iterations
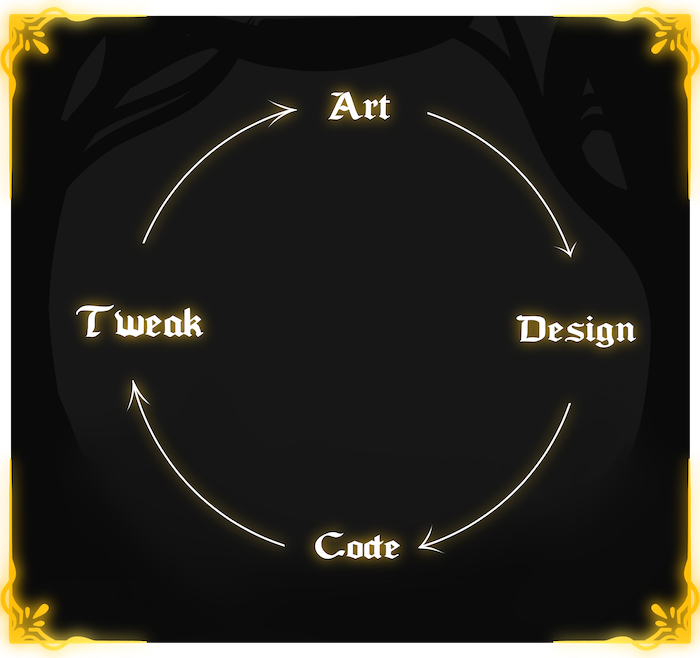
No matter which method you chose to use, each of them leads to the same thing: iterations.
If we had to resume this with a sentence it would be something like “art > design > code > tweaking > art > design > code > tweaking…”

When is it enough? Here is the big question no-one can answer, junior nor veteran.
We are never 100% happy with our creative work and sometimes we can go back months after to change a little thing, when everything seems to be done.
Game developers have a saying I hear a lot: “A game is never done, only abandoned” (which originally came from Leonardo da Vinci talking about Art).
While making the Gold Project, we try to make the maximum of iterations we can, according to our previsional planning. Once we like a monster we move on to the next one.
And then, later, we do another iteration over all monsters to check one more time if there is something we want to change, or if we have a new idea.
Most of the time it will result in a visual evolution more than a functional evolution.
Why visual only? Because once a monster is technically done, except for bugs, we rarely have to change it after all the tests and playtests we did.
Tweaking can take a lot of time, but once we find the good one, we rarely change it later.
During the production of new monsters, our visual skills improve. This make us notice some issues on the precedently created monsters.
Small precision, sometimes an evolution is not necessarily “more beautiful” if we only see the monster alone. We have to take all the game in consideration, the gameplay and how it is readable in the game, levels, but also its size and animations.
Preview of the Biome 1
We hope this article was interesting to read!
Before we go back to work, we wish you a Happy New Year !
As promised, let us conclude this article by revealing a preview of the biome 1: The Forest.
Pingback: April Update: A closer look at biome 2 and our solution for arachnophobia - Blog Dreamirl
Pingback: DEV BLOG 09 - August update - Blog Dreamirl
Responsible gaming is key, folks! Seeing platforms like ph889 login apk prioritize verification steps-ID & address-is a good sign for security. Remember to set limits & play within your means! It’s entertainment, not income.